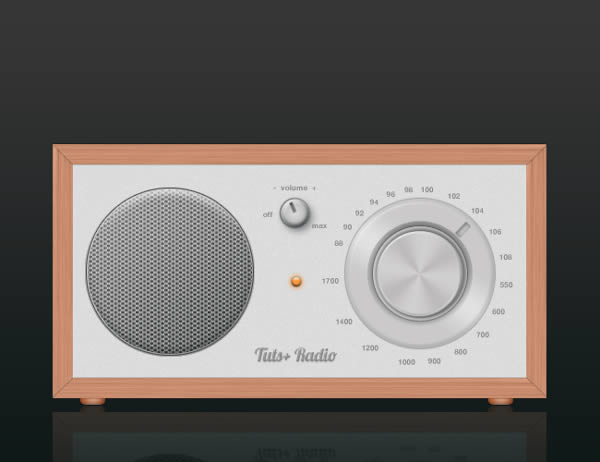
In this tutorial we will show you how to create a detailed radio icon using Photoshop’s vector editing capabilities. Let’s get started!
Tutorial Assets
Step 1
Fire up Photoshop and create a new document sized at 650x500px with resolution of 72 px/inch.
Step 2
Open up Layer Style panel and apply Gradient Overlay.
Step 3
Set Foreground and Background colors to #a96d51 and #e5a889 respectively. Create new layer on top and fill it with Foreground color. Go to Filter > Render > Fibers, set the Variance to 16 and Strength to 55 and then hit apply.
Invoke Free Transform Tool (Cmd/Ctrl + T), set the Reference Point Location to middle-left and scale it down horizontally. This will make the texture more dense.
Now with Free Transform Tool to scale down wood texture vertically.
Step 4
Duplicate this layer (Cmd/Ctrl + J) and position like on the image below.
Again duplicate layer, rotate 90 degrees and scale it up horizontally.
Make sure you are on the last duplicated layer, pick up Polygonal Lasso Tool (L) and make a selection as shown below, then hit Delete to clear.
Open up Layer Style panel and apply Drop Shadow.
Duplicate this layer, flip vertical (Edit > Transform > Flip Vertical), edit Drop Shadow to change the angle to -90 degrees, and move it down to complete the frame.
Finally select all frame sides and group them.
Step 5
Create new layer just below wooden frame layer, create selection using Rectangular Marquee Tool (M), and fill it with #e6e6e6 color.
Create new layer above, create Clipping Mask (Cmd/Ctrl + Alt + G), and this fill layer with black color. Reset Foreground and Background colors to black and white (press D on keyboard) and apply Noise. Change the Blend Mode to Soft Light and set Opacity to 50%.
Step 6
In this step we will add speaker to our radio. Add new layer on top, with Elliptical Marquee Tool (M) make selection and fill it with any color.
Set Fill to 0% and apply following layer styles.
Cmd/Ctrl + click on layer thumbnail to create selection, go to Select > Modify > Contract and contract selection by 2px. Create new layer and fill selection with #c4c4c4 color.
Download and install
Metal Mesh Patterns-Pack 1 by ~Axertion. Open Layer Style and apply Bevel and Emboss, Gradient Overlay and Pattern Overlay (use Hex Metal Mash pattern).
Step 7
Create gray (#cfcece) circle using Ellipse Tool (U) like on the image below,
Apply layer styles.
Step 8
Duplicate this circle, scale it down, add new layer styles and set Fill to 0%.
Step 9
Duplicate this layer, change color to #c9c8c8, clear previous layer styles and apply Drop Shadow. Make sure that Fill is set to 100%.
Step 10
Duplicate this layer, make it smaller a bit, and add following layer styles.
Step 11
Again duplicate layer and apply Bevel and Emboss and Gradient Overlay.
Step 12
Let us add selector indicator. Invoke Rectangle Tool (U), draw small rectangle, rotate, position it like shown on the image below, apply Inner Shadow and Stroke from Layer Style panel, and set Fill to 0%.
Add frequency scale around selector using Horizontal Type Tool (T).
Step 13
It’s time to add power/volume button. Create circle using Ellipse Tool (U), set Fill to 0% and give this layer following layer styles.
Step 14
Create another circle (#b6b6b6), a bit smaller and apply layer styles.
Step 15
Duplicate this circle and edit layer styles.
Step 16
With Rectangle Tool (U) create selector indicator, similar like we did in Step 12 (remember to set Fill to 0%).
Add commands using Type Tool.
Step 17
Finally add power led indicator. Draw small orange (#fc973d) circle and add Outer Glow, Bevel and Emboss and Stroke.
Step 18
Step 19
By adding “feet” we are going to finish our radio. Pick up Rounded Rectangle Tool (U) and with Radius set to 5px draw small brown (#c37b56) rectangle, just above background layer and apply Gradient Overlay and Bevel and Emboss from Layer Style.
Repeat the process to create the other foot.
Step 20
We’re almost there! Select all layers, except background layers, duplicate them and then merge them into one layer. Place this resulting layer just above background layer, flip vertically, move down.
Set Opacity to 35%.
Add Layer Mask, set Foreground color to black, and draw few Foreground to Transparent gradients to mask out the bottom part of reflection.
Conclusion
That’s it. I hope you learned something new from this tutorial and I also hope you liked it and had fun!
